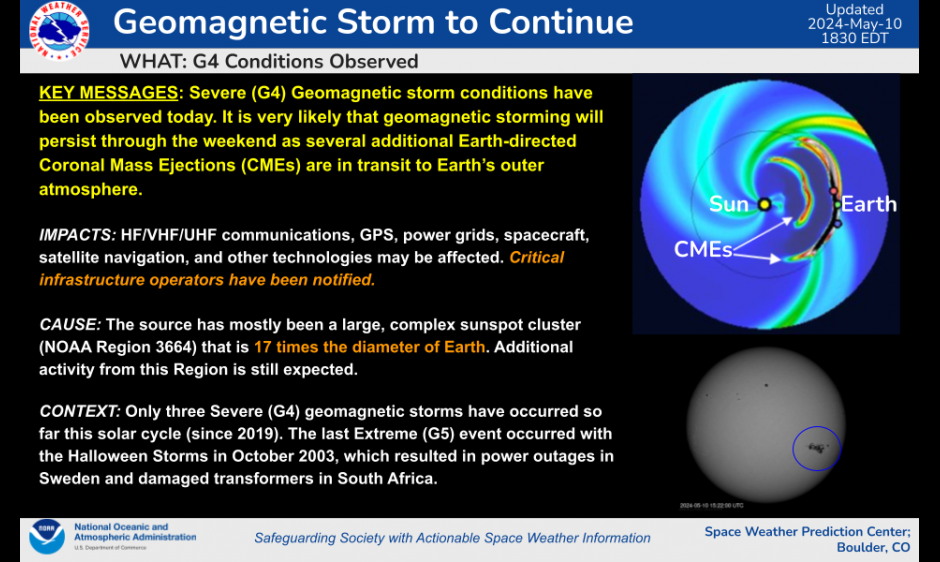
Right now the earth is being hit with a geomagnetic storm from the sun. The technical explanation of what this means, though interesting, will for now take back-seat an opportunity that is coming as a consequence. You might be able to see the Northern Lights as far south as Alabama this weekend!
The solar flares responsible for this opportunity occurred on Wednesday. At least 5 of the solar flares are though to be directed towards earth, according to NOAA. If you are out late this weekend, look north. Even if you can’t see anything with the naked eye, if you have clear weather, try taking a long exposure photo. You might be able to photograph an aurora!
Posts may contain products with affiliate links. When you make purchases using these links, we receive a small commission at no extra cost to you. Thank you for your support.
UPDATE: The launch is now delayed until 17 May to give time to replace O2 pressure regulation valve.
Boing is going to make a second attempt to launch its Starliner manned spacecraft. The first attempt was scrubbed because of a stuck valve. The next attempt is scheduled for Thursday 8 May at about 10:11 PM. Emphasis on “Attempt” because there is no guarantee that it will happen. The craft is capable of holding up to 7 people. But for this test flight there will only be three people. Barry Willmore, 61, is a NASA astronaut and former U.S. Navy Captain that will be in command. Sunita Williams, 58, is a former Navy server member, will be piloting. The flight plan for the Starliner includes a stay at the International Space Station for a week before returning the astronauts. If this launches, this will be Boeing’s first manned space flight.
This won’t be the first flight of the spacecraft itself. It first launched in 2019, but failed to rendezvous with the Space Station because of a software error. It was successful in a launch in May 2022. Though after that flight Boeing decided to change the type of tape used on the electrical cables to a material that was more fire resistant since then.
Someone had an NFC card for which I needed the data. There are a couple of ways I could have gotten it from him. One way was to ask him to install an app and scan the card. From the app, he could export the data and send it to me. I don’t generally like to ask people to install apps though. The other option was to make a web page and have him use the web page to scan the card. Key factors here is that he was using a Samsung Android phone and he uses Chrome as his primary driver. Chrome on Android has NFC support.
I needed to make the page in a hurry. It’s a single file web page. You can find it at this URL: https://j2inet.github.io/nfcreader/. You can view the source code completely through this link. If you are viewing this article from your computer and want to run the code on your phone, here’s a QR Code to that same URL.
The Interface
The interface is just a bit of HTML decorated with CSS attributes. We don’t need to explore the CSS to understand the interface. There are a couple of buttons for enabling and disabling a scanner, and a checkbox that, when checked, will cause the NFC card’s serial number to also be displayed.
At the time of this writing, NFC support is still considered experimental. mozilla.org reports support for Chrome 89, Opera 63, Samsung Internet 15.0, and WebView 89. I only tested this in Samsung Internet, Samsung Internet Beta, and Chrome. I only experienced this working in Chrome. Tho check whether your browser supports this API, see if the window object defines NDEFReader. If it does not, then the device doesn’t support reading NFC. Note that it is possible for a browser to have software support for NFC while the device has no available NFC hardware. That’s not something that you can test for.
if (! ('NDEFReader' in window))  {
   //This device doesn't have NFC capabilities.
   document.getElementById('scanButton').disabled = true;
   document.getElementById('stopScanButton').disabled = true;
   document.getElementById('lastError').innerText = "Sorry, this app only works on devices capable of reading NFC"
}
Before attempting to read the from the NFC card, you’ll need to create an object and set some handlers. You’ll need to create a new NDEFReader object. No parameters are required for its constructor. On the newly created object, add handlers for onreading and onreadingerror.
We will talk about the body of the onreading method shortly.
Initiating the Scan
You can initiate a scan just by calling the scan() method on the NDEFReader object with no parameters. I don’t suggest that though. You will probably want to pass an abort object to the method. This gives you a method to deactivate the scanner at will. For this purpose, I’ve created an AbortController instance.
ar abortController = new AbortController();
The scan method returns a promise. We can use this to know if something went wrong or if the application decided to terminate the scanning. The object returned in this promose is defined by us. On the object I return I may have an isError and reasonText object.
The onreading handler is given an event object. That object has a few elements of concern to us. One is serialNumber, which is a string that contains the serial number for that specific NFC card. The other element is message, which contains a NDEFMessage object. That’s where we will find most of the data! The NDEFMessage object has a field called records; that is a list of the NDEF records written to the card. You may typically encounter NFC cards that only have one message on it, but it can have multiple messages. If you iterate through this object on a non-empty list, you will find one or more NDEFRecordobjects. These are the fields from the record that I find to be the most important.
Field
Explination
recordType
The type of record. It could be the strings "empty", "text", "url", "smart-poster", "absolute-url", "mine", or "unknown". It could also be a custom domain name and custom type separated with a colon(:).
mediaType
Returns the mime type of the record.
data
Returns the raw byte data of the record’s payload.
encoding
The encoding used for a text payload. This could be null.
Iterating and Displaying the Records
For displaying the records, I build a few HTML objects and populate their innerText with the values. I optionally include the serial number to the card. I’m only displaying the record type and the text data. For the card that I needed someone to scan, I knew that this would be sufficient for my purposes. I displayed both the text representation of the data and the raw bytes themselves. Displaying the raw bytes was just a matter of converting the byte values to numeric strings. The browser provides a TextDecoder object for this purpose.
utf8decoder = new TextDecoder('utf8');
...
dataTextElement.innerText = utf8decoder.decode(record.data.buffer);
Here is the complete text for what happens when the card is detected.
reader.onreading = (e) => {
    var rootResultElement = document.getElementById("scanResult");
    rootResultElement.innerText = "";

    var showSerialNumberChecked = document.getElementById('showSerialNumber').checked;
    if(showSerialNumberChecked) {
        var serialNumberElement = document.createElement('div');
        serialNumberElement.class = 'serialNumber';
        serialNumberElement.innerText = e.serialNumber;
        rootResultElement.appendChild(serialNumberElement)                    ;
    }

    for(var i=0;i<e.message.records.length;++i)
    {
        var record = e.message.records[i];
        var envelopeElement = document.createElement('div')
        envelopeElement.className = 'ndfmessage';

        var typeText = document.createElement('div');
        typeText.className = 'recordType'
        typeText.innerText = record.recordType;

        var dataElement = document.createElement('div');
        dataElement.className = 'ndefdata'
        dataElement.innerText = bufferToString(record.data.buffer);
        var dataTextElement = document.createElement('div');
        dataTextElement.innerText = utf8decoder.decode(record.data.buffer);
        envelopeElement.appendChild(typeText);
        envelopeElement.appendChild(dataElement);
        envelopeElement.appendChild(dataTextElement);
        rootResultElement.appendChild(envelopeElement);
    }
}
Posts may contain products with affiliate links. When you make purchases using these links, we receive a small commission at no extra cost to you. Thank you for your support.
I’ve been exploring Samsung Knox. For enrollment on my test devices, I had initiated a hard reset of the phone and used the secret gesture to get the device in enrollment mode (draw a plus on the initial welcoming screen). While reading through Knox documentation, I encountered a support document with a URL I had not seen before. https://me.samsungknox.com.
As it turns out, by going to this site you can enroll a device without performing a hard reset. This initiates Bluetooth Enrollment. You do need to have a device sitting by with Knox Deploy installed to push the profile to the device.
Posts may contain products with affiliate links. When you make purchases using these links, we receive a small commission at no extra cost to you. Thank you for your support.
I came across something that I thought was cool, though not something I would ever use. It was a set of C++ defines for Japanese language coders that let’s them write in C++ using Japanese words in the place of various C++ control statements and key words. The repository for this project can be found at https://gist.github.com/HerringtonDarkholme/2dbb2a1ec748a786f54908320447b3dd. Here are a few lines from the code.
#define  エスティーディー std
#define アイオーストリーム <iostream>
#define  ユージング using
#define イフ if
#define インクルード #include
#define イント int
You can probably guess what is going on here, but I will explain. The Japanese characters here are Katakana. They are commonly used to phonetically spelling out words from other languages. The very first define here is kind of clumsy. It spells out how we would say std. As in ess-tee-dee. The rest of the defines spell out the English pronunciations of the words. I found out about this by way of the following tweet, which showed some C++ written using a substantial amount of Japanese.
While it looks cool, I have a preference of minimizing my use of defines in my C++ code. But I’m also not a native 日本語 speaker. I imagine this provides some advantages for someone that is.
Posts may contain products with affiliate links. When you make purchases using these links, we receive a small commission at no extra cost to you. Thank you for your support.
I’ve been looking at the Samsung FlipSuit cards lately. For the uninitiated, these are cards that one slips into a case that cause the phone to also change the content of its inner and outer screens to match the theme on the card. You can find these for the Galaxy Flip 4/5, and more recently the Galaxy S24. A question I’ve seen asked in reading about these is “How do they work” and “Can I make my own.” While I don’t have sufficient technical data needed to enable you to go off and make your own, I do have some knowledge of how these work. These are not the first iteration of such a system. The earliest form of those date back to 2018.
Galaxy Friends: An Ancestor of FlipSuit
At the Samsung Developer’s Conference from 2018, one of the technologies and solutions on display was Samsung Theme Studio. With Theme Studio, a creative could package changes to the UI to give the phone an entirely new look and feel. These themes are packaged in an APK (like other Android applications) and available for download in the Samsung App Store. This tool is relevant to another offering released that same year.
At the same conference, Samsung showcased the Galaxy Friends Accessory program. Under this program, someone could make an NFC enabled and associate that case with a Theme and other content. The theme would automatically be applied just by putting the case on a phone. In addition to the theme, content and applications could be associated with the case. Someone could get exclusive access to content (that could be changed as frequently as once a day) through having this case. It’s not hard to draw a line between this and the Galaxy FlipSuit cards.
Where can you find the Galaxy Friends program now? I don’t think that you can. The email address associated with it no longer exists. Outside of a few forum posts, there is no mention of it on Samsung’s site at all. The strongest remaining items of evidence that it existed are in the forms of a couple of Amazon listings for Galaxy Friends cases for the Note 10 (Ironman Case, Spiderman Case). Reviews for it make mention of the NFC Chip and the theme that gets applied to the phone.
Does that mean Galaxy Friends is dead and gone? Well, no. Searching for that name yields few results, but searching for the functionality is a different matter.
Knox Configure
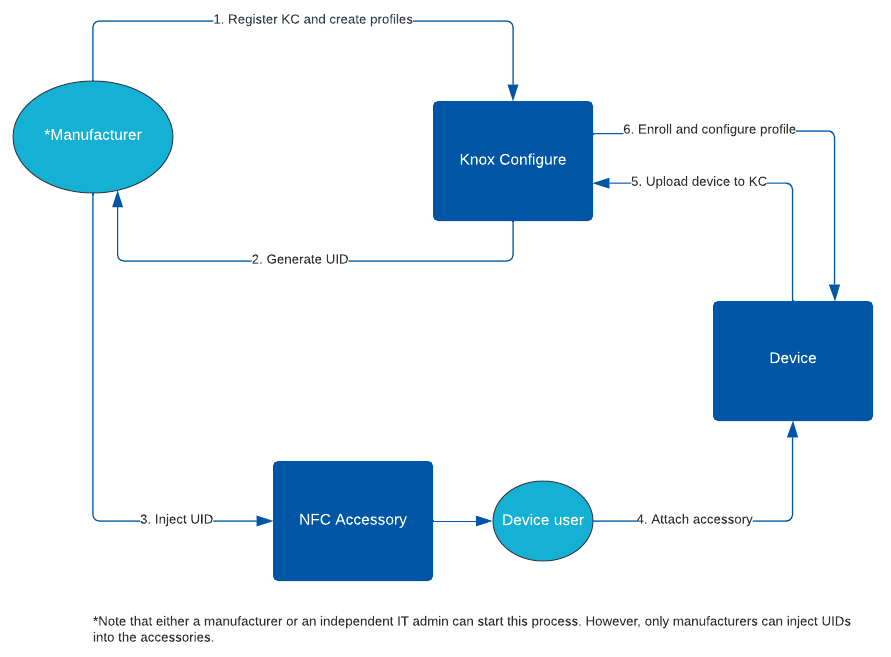
Over the years, Samsung has moved its products and services related to device management, configuration, and security under the Knox branding. While you can find some mention of Knox across a broad range of products (don’t be surprised if you find a Wi-Fi enabled clothing washer with Knox) we are most interested in the services on mobile devices. I’ve found that some are confused on what Knox is because of the broad list of products on which it can be found. The specific Knox service in which we have interest is Knox Configure.
Knox Configure provides functionality for enrolling and configuring a device even before it has been removed from its box. A device’s unique ID could be added to someone’s Samsung Knox account (usually through a Samsung reseller). A device could also be enrolled during setup, or enrolled by an accessory. For accessory enrolment, the accessory could be an NFC device, a cover, or a USB device. You might think that NFC devices and covers are identical, but more on that in a moment.
Once enrolled, a device will apply a profile. The profile could contain a variety of settings and applications to be applied to the device. There are two profile attributes of special interest here, the theme and the accessory ID. The theme, according to Samsung’s documentation, would be created by Theme Studio. There’s a bit of a break-down in process and/or documentation here. While Knox Configure points to the Theme Studio page, telling a developer they should get access to it, Theme Studio access is restricted. Years ago, anyone could get access to it. Present day, someone wishing to have access can apply during windows that open every other year (the next window is said to be in 2025). I get the impression that the Knox Configure group in Samsung and the Theme Studio groups are not completely in sync with each other. For those reading this with the hopes of making your own themes, here if your first obstacle.
The accessory ID attributes are meant to be written to the USB, NFC, or cover device. According to Samsung’s current documentation, this is something that should be done by a Samsung Accessory Partner.
These profiles are housed on Samsung’s servers and associated with a licenses that the person making the profile hat to purchase. That these profiles are tied to callbacks to a Samsung services implies that one wouldn’t be able to arbitrarily make their own card without Samsung’s involvement.
There may be other services that Samsung has for distribution of content based on an NFC cards of which I don’t know. Note that Knox is just one of them.
NFC Device Enrollment
How does the NFC device invoke enrollment? One of the messages encoded on an NFC card will be a URL. This URL starts with smdm://accessory (Samsung Mobile Device Management?). This URL will have additionally parameters attached to it. But this URI prefix is important. There is a package that is registered to handle URLs that start with this prefixed. The common name for the package is “Knox Enrollment.” The package identifier is com.sec.enterprise.knox.cloudmdm.smdms. I’ve found that if I use this URL without specifying any parameters that this process will crash and I see output on logcat. I’ve been able to figure out some of the other parameter names, but I have no idea what their potential values would be. Here are some of the other potential parameters passed.
countryiso_code
deviceProductType
email
mdm_token
program
seg_url
service_type
update_url
mdm_token
I speculate that if any information is to be found on potential values for these, that the information will be found in the Knox SDK Documentation. These values get passed to the Knox Enrollment service through this service. Once the device is enrolled, the associated configuration items are applied, including and themes or applications associated with the profile. However, I don’t think that information on all of the values will be found through documentation that is generally avaialble. Samsung explicitly states in one of their documents that only accessory manufacturers can inject the IDs into the accessories.
Image from Samsung documentation stating that only manufacturers can inject identifiers into accessories.
Examining a FlipSuit Card
Though I’ve seen the FlipSuit cards described as NFC cards, I’m not entirely convince of this. When I hold one of these cards to an NFC reading device I get nothing. It is possible that it uses some features of NFC unfamiliar to me. I don’t have either a Flip 5 or Galaxy S24 (the most recent phone that I have my hands on is an S23). Earlier, I mentioned that Knox Config has NFC and covers listed as separate device types. I think this is why, there is something different in the communication from an NFC card and the Flip cards. I held a FlipSuit card to the back of a Galaxy Flip 5 while an NFC examination application was running. I got no info.
What Happens when a Knox Configure License Expires
Knox Configure and cases with themes have been around long enough such that we know what happens when a theme expires. Consider the Galaxy S20 and it’s LED case. The LED case had a theme that was associated with it. That theme expired on or around January 1, 2023. Some users in a reddit thread discussed their experience.Of note, before the theme reached it’s expiration date, there was a notification for it. Note that this notification refers to “Samsung Galaxy Friends.” It’s not clear to me if the theme was expiring because the Galaxy Friends program was being sunset or because the license associated with the theme was at the end of it’s life.
Screen with notification about expiring theme.
When the date was reached, the theme automatically uninstalled.
Notification of Theme Uninstalling.
The Pathway To Making Theme Cards
I’ve mentioned obstacles and information and obstacles. If you still wanted to go through with making a theme card, what would you do? You need to get access to Theme Studio. While the next window for applying for Theme Studio isn’t until 2025, this might not be as much as a problem as some might initially think. Between now and when the window opens, you can start practing designing your themes and get a portfolio put together for the application process. After you have access to Theme Studio and are able to publish themes, you might want to become familiar with Knox Configure. You can get a 90-day subscription to Knox Configure at no cost. You won’t need to get a deep understanding of it though. For making the cards themselves though, you will need to go through a Samsung Accessory Partner. There’s no way around that of which I know, since the information I have on how data is written to the card is incomplete.
Though not in furtherance of making Theme Cards, in one of my next posts, I will be exploring a simple Knox Configuration scenario to customize a Samsung device. I’ll also be posting the code that I used for examining NFC cards. The code was written completely in HTML and JavaScript.
Posts may contain products with affiliate links. When you make purchases using these links, we receive a small commission at no extra cost to you. Thank you for your support.
The Whitehouse has sent NASA orders to develop a lunar time zone. At first glance, some might think that this is silly. There are no people on the moon, why is a time zone needed? While it is easy to coordinate time on earth, coordinating time between the earth and moon is a bit different because of the effects of gravity/mass on the passage of time. The moon has less mass than the earth, resulting in time passing at a different rate. The difference in the rate of the passage of time is tiny, but can be significant when working with high-precision clocks. A clock on the moon and earth would drift apart by about 58 microseconds per day.
NASA was asked to come up with the system for Lunar Coordinated Time by the end of 2026. The efforts will include contributions of international bodies and the 36 nations that are part of the Artemis Accords. This will add to the systems of time used in astronomy such as a solar day, mean solar day, sidereal day, and the 11 time zones on Mars.
Posts may contain products with affiliate links. When you make purchases using these links, we receive a small commission at no extra cost to you. Thank you for your support.
If you are in the United States or Mexico, come Tuesday 8 April you might be able to view a total solar eclipse. Even if you are not in the path of totality, you might have an opportunity to view a partial eclipse. If you are interested in viewing, the key pieces of information you need are when it will be, where it can be viewed, and what you need for viewing. It isn’t too late just yet to get viewing equipment (if you are interested in any). But if something shows a delivery date of Monday, consider it something that will likely not arrive in time.
When and Where
The time at which you can see the eclipse will vary by location and timezone. NASA has in which you can enter a zip code and get the information for your location. Even if you are not in the path of totality, you might be able to see a partial eclipse.
Location
Partial Begins
Totality Begins
Maximum
Totality Ends
Partial Ends
Dallas, Texas
12:23 CDT
13:40 CDT
13:42 CDT
13:44 CDT
15:02 CDT
Idabel, Oklahoma
12:28 CDT
13:45 CDT
13:47 CDT
13:49 CDT
15:06 CDT
Little Rock, Arkansas
12:33 CDR
13:51 CDT
13:52 CDT
13:454 CDT
15:11 CDT
Poplar Bluff, Missouri
12:39 CDT
13:56 CDT
13:56 CDT
14:00 CDT
15:15 CDT
Paducah, Kentucky
12:42 CDT
13:59 CDT
14:01 CDT
14:02 CDT
15:18 CDT
Carbondale, Illinois
12:42 CDT
14:00 CDT
14:01 CDT
14:03 CDT
15:18 CDT
Evansville, Indiana
12:45 CDT
14:02 CDT
14:04 CDT
14:05 CDT
15:20 CDT
Clevland, Ohio
13:50 EDT
15:13 EDT
15:15 EDT
15:17 CDT
16:29 EDT
Erie, Pennsylvania
2:02 EDT
15:16 EDT
15:18 EDT
15:20 EDT
16:30 EDT
Buffalo, New York
14:04 EDT
15:18 EDT
15:20 EDT
15:22 EDT
16:32 EDT
Burlington, Vermont
14:14 EDT
15:26 EDT
15:27 EDT
15:29 EDT
16:37 EDT
Lancaster, New Hampshire
14:16 EDT
15:27 EDT
15:29 EDT
15:20 EDT
16:28 EDT
Caribou, Main
13:22 EDT
15:32 EDT
15:33 EDT
13:34 EDT
16:40 EDT
What do you need for viewing?
There are a lot of options for equipment. The simplest option would be a pinhold projector or some variation of it. To make one of these, you only need a stiff piece of material, such as cardboard, and a white sheet of paper. Drill a hold in the center of the cardboard. If you aim the hold for the cardboard at the sun and place the paper behind it with a decent gap between them, you’ll see a circle of light on the carboard. That’s a projection of the sun. As the eclipse progresses, it will be more apparent that this is an image of the sun as you see the sape of the moon encroching on the projection. This solution isn’t much different from the earliers cameras (Camera Obscura), which were made by cutting off all light sources in a room except for one edge with a hole or lens. The image of what is going on outside the room is projected on the wall opposite to the hole.
The next step up for viewing would be to have solar viewing glasses. These are usually have cardboard frames with a thin plastic where lenses would go. Though either absorption or reflection, these glasses prevent an overwhelming majority of the light from reaching your eyes so that you can safely view the image. They are as cheap as 0.80 USD for disposable units and as much as 7 USD for some of the studier ones. If you are a T-Mobile subscriber, you might have grabed some solar glasses for T-Mobile Tuesday for free.
If you plan to use your smartphone to take pictures, you might run into a challenge if you try to put the glasses in front of your phone. Even if you zoom for your phone’s camera to use a specific lens, some phones will still switch lenses based on changes in lighting conditions. It may be easier to get a silter specificly made for the phone.
Beyond glasses, there are magnifying devices or viewing the eclipse. The least expensive of these would be eclipse binoculars. These darkened binoculars give you a much more dramativ perspective of the show. On the higher end of this, there are telescopes that have been fitted with solar filters (similar to the glasses). This would be an option to considere only if you already have a telescope. Keep in mind that if you are using a regular telescope, do not use a viewfinder to aim the scope. That would be a great way to cause eye damage. Instead, keep the caps on the viewfnder so that it is blocked and put a sheet of paper behind the viewfinder. When it is aimed properly, the sioulette of the viewfinder will be a perfect circle.
Finishing Preperations
Check your local weather before monday. If you know the weather might not be good, you may be less disapointed if and when it doesn’t allow viewing. If you have the option, make it a work from home day. Remember to block your calendar around the time of the eclipses maximum. If you plan on viewing away from home, load your glasses into your car so that they are not forgotten. If you plan to order viewing equipment, make sure you have it in hand by Sunday!
Posts may contain products with affiliate links. When you make purchases using these links, we receive a small commission at no extra cost to you. Thank you for your support.
Some recent news articles have made more people aware of data collection for GM vehicles that could, for some, raise insurance rate. The OnStar Safe Driver program collects information about driver habits, such as maximum speeds, instances of hard breaking, hard acceleration, and seatbelt use. This information is collected by GM and available to at least two known data brokers (Lexis Nexis, Verisk) and can end up working it’s way to one’s Insurance company, affecting rates. Two instances of people unhappy with this service include a person in Florida suing both Cadillac and Lexis Nexis after his insurance rates increased and a Chevy Bolt driver whose insurance rates went up.
Did GM Automatically Opt Me Into This Program?
The OnStar Smart Driver Q&A says the following.
Do you auto enroll customers in OnStar Smart Drive?
No, we do not auto enroll customers into OnStar Smart Driver. All customers must opt-in to be enrolled.
Depending on your driving style, this could be something that works to your advantage. But in either case, it is good to know how to opt out of it. Many of the GM vehicles have brand-specific variations of an application. For my vehicle, the application is myChevrolet (Android, iOS). Other variants include myGMC (Android, iOS), myBuick (Android, iOS), and myCadillac(Android, iOS).
To turn the feature off, open your GM app and go to the section titled “Trip Overviews and Insights.” (You’ll see “OnStar Smart Driver” listed there). Select it.
One the next screen, click on the geat icon in the upper-right corner to open the settings for this feature.
From there, you’ll sww a switch for turning the feature off. Use this switch to opt out of the program.
What if I don’t have the App Installed?
If you don’t have the application installed but know your GM login, you can unenroll through the website.
To unenroll via the vehicle brand website, sign into your account. Click on “Account,” scroll down the page and click on “Data & Privacy.” Scroll down to “OnStar Smart Driver” and select “Manage Settings.” From there, switch off the “OnStar Smart Driver” toggle.
Of you want to know more about the OnStar Driver Safety Program you can read about it here. Though I thought the website was a bit light on information.
I want my collected data removed. What do I do?
You will need to contact Lexis Nexis or Verisk for more information on removal of your data. You can contact them for more information about having your data removed or seeing what data they have on you.
Posts may contain products with affiliate links. When you make purchases using these links, we receive a small commission at no extra cost to you. Thank you for your support.
I have a DSLR that has been modified for Infrared Photography. Digital cameras usually have filters that will block out light that is outside of the visible spectrum. Without these filters, though we cant see this light, the camera’s sensor will still respond to it. If you have an IR remote you can test this out yourself by viewing the emitter end through the camera on your phone and holding down a button on the remote.
The world looks different when you biew the IR or UV light reactions with objects. There are elements of an object that may be invisible until you view them in another spectrum, and elements that might disappear all together. I wanted to explore this more, which is why I have this modified camera. There are a few things that I’ve learned along the way. Once a camera is modified for IR shooting, it’s not very good to use for regular photography. You won’t want to take family photos or vacation pictures with such a modified camera. The viewfinder on the DSLR also becomes useless for some shooting situations; since our eyes cannot see IR light, when some filters are applied to the camera, the view through the viewfinder looks black. Instead, we must enable a live view on the camera’s display to preview the image.
The IR blocking filter being removed from the camera isn’t the only adjustment that needs to be done. Better results come from also adding a filter to the lens that blocks some of the visible colors of light. Post-processing of the photo will be necessary.
I’ve been wanting to take a photograph with the camera for the last week. But obligations to others and my work schedule preventing me from being available for some of the prime hours of the day where the sun would be where I would like for it to be. Today, between meetings, I had a chance to run outside, snap a couple of photographs of a flower, and run back inside. The image that shows at the top of this post is one of the results. That image was taken with a filter on the lens that only lets IR light pass. If I remove the filter, I end up with a picture like the following. Removing the filter and allowing visible light to come through, I get a photo that looks partially desaturated.Though color is present, the influence of the IR on the photo is discernable.
While out at “the farm” I took some pictures of some chickens. As appears to be the case with many things that are red, in infrared they appear closer to white. The chicken’s comb’s look especially white.
I’ll be taking more occasional photographs using this camera. When I do, you’ll generally be able to find them on my Instagram page.
This a lot more for me to learn. I hope to have some interesting shows to post.
Posts may contain products with affiliate links. When you make purchases using these links, we receive a small commission at no extra cost to you. Thank you for your support.
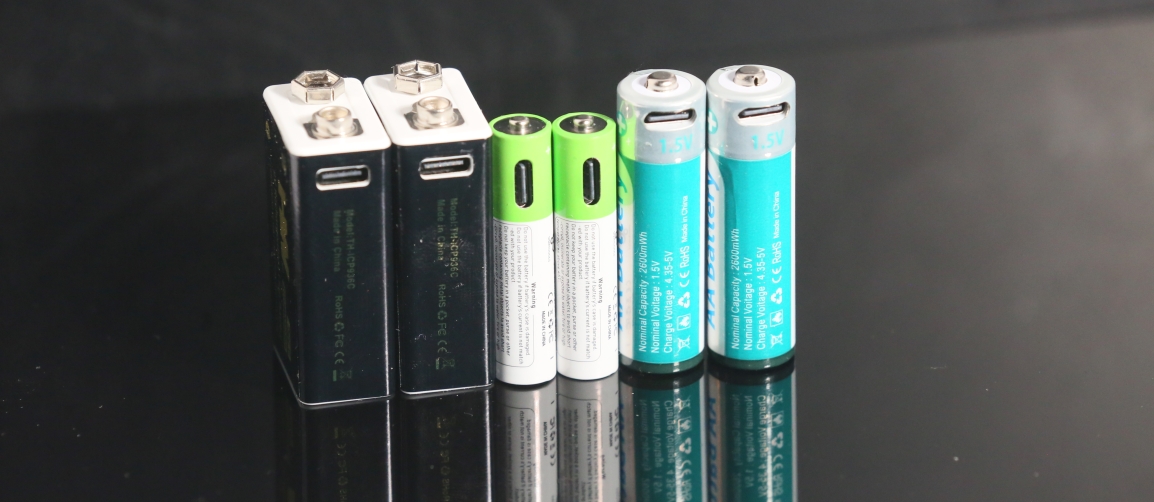
Over the past year, I’ve transitioned some of my devices from conventional to rechargeable batteries. I’ve used rechargeable batteries before and had generally been disappointed with them. The need for a separate charger for each battery type sometimes meant extra hardware to keep up with.
With these batteries, one of the main advantages is that they charge over a USB-C cable. Though they came with USB-A to USB-C cables for charging, I generally use the cables that and power supplies that I already have for my phones.
These don’t last as long as a conventional battery, but I’m okay with that since the charging experience is no-fuss. I often forget to turn off my voice recorder and run through batteries in it quickly. With these, it is less of a concern.
Presently, I’m using AA, AAA, and 9-Volt batteries. You can find all of these on Amazon among other places. The affiliate links for the ones that I purchased are below.
Posts may contain products with affiliate links. When you make purchases using these links, we receive a small commission at no extra cost to you. Thank you for your support.
With some of the free time I had, I decided to remake a video game from my childhood. Though the game was rendered with 3D visuals, it was essentially a 2D game. I’ll need to detect collisions when two actors in the game occupy the same footprint. The footprints will usually be rectangular. But these rectangles could be oriented in any way. Detection of orthognal overlapping bounding boxes is a simple matter of checking if some pointes are within range. But if they are not oriented parallel/perpendicular to each other, then a different check must be done.
Rectangles can be constructed with two triangles. The solution to detecting overlapping rectangles is built upon finding intersection with a triangle. Let’s look at point-triangle intersection first. Let’s visualize some overlapping and non-overlapping scenarios.
Examining this visually, you can intuitively state whether any selected pair of triangles or points intersect with each other. But if I provided you only with the points that make up each triangle, how would you state whether overlap occurs? An algorithmic solution is needed. The two solutions I show here did not originate with me. I found solutions on StackOverflow and RosettaCode. But what I present here is not a copy and past of the solutions. They’ve been adapted some to my needs.
For my points and triangles, I’ll use the following structures.
struct Point
{
	float x;
	float y;
};

struct Triangle
{
	Point pointList[3];
};
There are lots of ways to detect whether a point iw within a triangle. Before writing my own, I found a simple one on GameDev.net. This is an adjusted implementation.
Usage is simple. Passing a point and a triangle to the function pointInTriangle results in the return of a bool value that is true if the point interacts with the triangle.
Having Point-Triangle intersection is great, but I wanted Triangle-Triangle intersection. I decided to use an algorithm from RosettaCode. The code I present here isn’t identical to what was presented there, though. Some adjustments have been made, as I prefer to avoid using explicit pointers to functions. My definition of Triangle and Point are expanded to accomodate the implementation’s use of indices to access the parts of the triangle. By unioning the two definitions, I can use either notation for accessing the members.
struct Point
{
	union {
		struct {
			float x;
			float y;
		};
		float pointList[2];
	};
};

struct Triangle
{
	union {
		struct {
			Point p1;
			Point p2;
			Point p3;
		};
		Point pointList[3];
	};
};
The algorithm makes use of the determinate function, an operation from matrix math. I’m going to skip over explaining the concept of determinants. Explanation of matrix operations deserves its own post.
Another key attribute of this implementation is that it optionally usually enforces the angles of a triangle being provided in a counter-clockwise order. If they are always passed in the same order, there is an opportunity for faster execution of the code. I chose general usability over speed. But I did mark the code with attributes to suggest that the compiler optimize for them being passed in that order.
The original algorithm had a couple of functions that were used to check for boundary collisions or ignore boundary collisions. I have expanded them from 2 functions to 4 functions. Whereas the original structured often as three points that are arbitrarily passed to a function, I prefer to pass triangles as a packaged structure. There is a place in the algorithm where a calculation is formed on a triangle formed by two points of one triangle and one point of the other triangle. The second forms of these functions accept points and will create a triangle from them.
With all of those pieces in place, we can finally look at the part of the algorithm that returns true or false to indicate triangle overlap. The algorithm checks each point of one triangle to see if it is on the interior or external side of each edge of the triangle. If all of the points are on the external side, then no collision has been connected. Then it does the same check swapping the roles of the triangles.If any of the points are not external to the opposing triangle, then the triangles collide.
bool TriangleTriangleCollision(const Triangle& triangle1,
	const Triangle& triangle2,
	double eps = 0.0, bool allowReversed = true, bool onBoundary = true)
{
	//Trangles must be expressed anti-clockwise
	CheckTriWinding(triangle1, allowReversed);
	CheckTriWinding(triangle2, allowReversed);

	//For edge E of trangle 1,
	for (int i = 0; i < 3; i++)
	{
		int j = (i + 1) % 3;
		[[likely]]
		if (onBoundary)
		{

			//Check all points of trangle 2 lay on the external side of the edge E. If
			//they do, the triangles do not collide.
			if (BoundaryCollideChk(triangle1.pointList[i], triangle1.pointList[j], triangle2.pointList[0], eps) &&
				BoundaryCollideChk(triangle1.pointList[i], triangle1.pointList[j], triangle2.pointList[1], eps) &&
				BoundaryCollideChk(triangle1.pointList[i], triangle1.pointList[j], triangle2.pointList[2], eps))
				return false;
		}
		else
		{
			if (BoundaryDoesntCollideChk(triangle1.pointList[i], triangle1.pointList[j], triangle2.pointList[0], eps) &&
				BoundaryDoesntCollideChk(triangle1.pointList[i], triangle1.pointList[j], triangle2.pointList[1], eps) &&
				BoundaryDoesntCollideChk(triangle1.pointList[i], triangle1.pointList[j], triangle2.pointList[2], eps))
				return false;
		}

		if (onBoundary)
		{

			//Check all points of trangle 2 lay on the external side of the edge E. If
			//they do, the triangles do not collide.
			if (BoundaryCollideChk(triangle2.pointList[i], triangle2.pointList[j], triangle1.pointList[0], eps) &&
				BoundaryCollideChk(triangle2.pointList[i], triangle2.pointList[j], triangle1.pointList[1], eps) &&
				BoundaryCollideChk(triangle2.pointList[i], triangle2.pointList[j], triangle1.pointList[2], eps))
				return false;
		}
		else
		{
			if (BoundaryDoesntCollideChk(triangle2.pointList[i], triangle2.pointList[j], triangle1.pointList[0], eps) &&
				BoundaryDoesntCollideChk(triangle2.pointList[i], triangle2.pointList[j], triangle1.pointList[1], eps) &&
				BoundaryDoesntCollideChk(triangle2.pointList[i], triangle2.pointList[j], triangle1.pointList[2], eps))
				return false;
		}
	}
	//The triangles collide
	return true;
}
The basic usage of this code is similar to the point collision. Pass the two triangles to the function
Posts may contain products with affiliate links. When you make purchases using these links, we receive a small commission at no extra cost to you. Thank you for your support.
Bottom Line: A rule affecting robo-texting (which is done without a phone) was mistaken for a rule governing/punishing users of T-Mobile phones. T-Mobile has not applied any new fines to customers for their SMS content.
Update 2023 December 31 11:58PM EST
Since I’ve made this posts, there’s been a number of other statements and posts about this misunderstanding that I think are worth considering. The Associated Press published an article about this misunderstanding/misinformation
“The change only impacts third-party messaging vendors that send commercial mass messaging campaigns for other businesses,” the company wrote in a statement emailed to The Associated Press.
Associated Press
There is now a community note under the account of one of the people that accounts for many views of this item of misinformation on Twitter/X.
…Bandwidth the company the user is referring does not provide consumer service. These specific terms of service are for commercial/enterprise users of the T-Mobile network. This does not directly apply to P2P (Peer to peer) messaging.
Twitter/X Community note
There was also a post in the T-Mobile Community forums by a user that received a response from a T-Mobile Community Manager.
These changes only apply to third-party messaging vendors that send commercial mass messaging campaigns for other businesses. The vendors will be fined if the content they are sending does not meet the standards in our code of conduct, which is in place to protect consumers from illegal or illicit content and aligns to federal and state laws.
I watched misunderstanding get legs and spread pretty far during the Christmas holiday weekend. The gist of the misinformation is that T-Mobile is going to fine customers hundreds or thousands of dollars for sending text messages of which T-Mobile doesn’t improved. This misunderstanding appears to be derived from a reading of a Business Code of Conduct, but without an understanding of the terms involved or the partnerships between various companies. I’ll try to explain both in a moment.
Consumer and Non-Consumer Messages
If you have a T-Mobile phone and are sending text messages, those are consumer text messages. If you start a marketing campaign to send out mass SMS messages, create a 2FA service that sends out messages, or are using some other API access, those are non-consumer messages. A basic understanding of how consumer messages works is common, but not so for non-consumer messages. Let’s dig into that a bit more.
Non-Consumer messages are often sent through an API. These messages are sometimes labeled as A2P messages, which means “Application to Person.” The origin of these messages is not a phone. T-Mobile, AT&T, and Verizon provide the ability to post messages into their infrastructure for delivery. How do you get access to this functionality? Generally, you don’t. They don’t let everyone have access to these services. Instead, there are a number of companies with which they establish agreements and have granted access. If you want to use these services, you would establish a connection with one of these companies and they manage many of the other details of what needs to occur. Here are some names of companies that provide such services.
As far as a consumer knows the messages are coming from a 10 digit phone number. These phone numbers may be referred to as A2P 10DLC (Application to Person 10 Digit Long Code). When a new messaging campaign is started, the number associated with the campaign must be registered. The number being registered and associated with an entity, brand, or campaign. Unlike short code messages, if a business also needs to allow customers to call them, they have the option of setting up a voice line associated with the same phone number.
The entities and phone numbers may also be assigned a trust rating. Entities that have a higher trust rating may be granted more throughput on a carrier’s network. If an entity’s trust rating become low, their granted capacity might be lowered or their messages may be disallowed all together. Entities earn a reputation.
What Are These Rules Restricting?
In a nutshell, the rules published by T-Mobile, AT&T, and Verizon disallow text messaging campaigns for unlawful material, including material that may be lawful in some states but not others, scam messages, spam, phishing attempts and impersonation. Some carriers may specifically call out other types of material, but the same general characterization of restrictions apply. The following is what was posted by Bandwidth about the notice (Update 2024 January 2: Bandwidth.com has since restricted viewing the notice. A screenshot of the notice can be viewed here).
T-Mobile is instituting three new fees for non-compliant A2P traffic sent by non-consumers that result in a Severity-0 violation. A Sev-0, (Severity-0) represents the most harmful violation to consumers and is the highest level of escalation with which a carrier will engage with Bandwidth. This applies to all commercial, non-consumer,A2P products (SMS or MMS Short Code, Toll-Free, and 10DLC) that traverse T-Mobile’s network.
With what I’ve shared so far, you may be able to recognize this as something that is not directed at regular customers that are using T-Mobile. The false information I encountered on the change misidentifies the affected partiers as subscribers of the phone service. Let’s dig into what a Sev-0 violation is.
Phishing messages that appear to come from reputable companies
Depictions of violenge, messages engaging in harassment, defamation, deception, and fraud
Adult Material
High-Risk content that generates a lot of user complaints, such as home offers, payday loans, and gambling content.
Sex, Hate, Alcohol, Firearms, and Tabaco related content (SHAFT)
There is other content in this category. The above isn’t exhaustive.
Bandwidth list as having the highest fees messages related to phishing and social engineering at 2,000 USD per violation. Second, at a 1,000 USD fine is unlawful content such as controlled substances or substances not lawful in all 50 states. The lowest fine that Bandwidth mentions is 500 USD is for violations of SHAFT or messages that don’t follow state or federal regulations.
Overall, this looks to be a move that may motivate A2P partners to make more efforts to filter out certain type of content that is at least generally annoying if not worst.
What About the Other Carriers?
In the USA there are three nation-wide carriers. AT&T, T-Mobile, and Verizon offer service across the nation. I don’t know if Verizon or AT&T have fines associated with violations, but they do have a code of conduct for A2P providers. If you’d like to read their code of conduct documentations, you can find them here.
There’s a lot of overlap in their rules. This may come as no surprise, especially to those familiar with CTIA. CTIA is a wireless trade organization representing carriers in the USA, supplies, and manufacturers of wireless products. They have been around since the mid-1980s. Current members of CTIA include AT&T, T-Mobile, Verizon, and US Cellular. You can find a list of members here.
There is a lot more that could be said about how these messaging services work. I may detail it further one day. But for now, the main take-away is that there’s a popular misconception about the changes that T-Mobile is said to be implementing that are recognized as a mistaken interpretation once one has a casual familiarity with some of the terms involved.
Posts may contain products with affiliate links. When you make purchases using these links, we receive a small commission at no extra cost to you. Thank you for your support.
Christmas is around the corner. Among the items of interest this year is the Analogue Pocket. The Pocket is an FPGA based device that can hardware emulate a lot of older game consoles along with having some games of its own. I’m getting one prepared for someone else. But I also need to send the device soon to ensure that it arrives at its destination before Christmas. This creates a conflict with getting more games loaded while also shipping it on time. No worries, I can satisfy both if I send the device with something to upload the content.
This is done by a lot of physical game releases, when there is a zero-day “patch” for a game or when the disc is only a license for the game, but the actual game and it’s content are only available online. I’ll be shipping the memory card for the device with an call to action to run the “game installer” on the memory card. After the card is mailed, I can take care of preparing the actual image. The game installer will reach out to my website to find a list of files to download to the memory card, zip files to decompress, or folders to create.
Safety
Though I’m the only one that will be making payloads for my downloader to run, I still imagined some problem scenarios that I wanted to make impossible or more difficult. What if someone were to modify the download so that it were to target writing files to a system directory or some other location? I don’t want this to happen. I’ve made my downloader so that it can only write to the folder in which it lives and to subfolders. The characters that are needed to get to some parent level or to some other drive, if present in the download list, will intentionally cause the application to crash.
Describing an Asset
I started with describing the information that I would need to download an asset. An asset could be a file, a folder, or a zip file. I’ve got an enumeration for gflagging these types.
    public enum PayloadType
    {
        File,
        Folder,
        ZipFile,
    }
Each asset of this type (which I will call a “Payload” from hereon) can be described with the following structure.
    public class PayloadInformation
    {
        [JsonPropertyName("payloadType")]
        [JsonConverter(typeof(JsonStringEnumConverter))]
        public PayloadType PayloadType { get; set; } = PayloadType.File;

        [JsonPropertyName("fileURL")]
        public string FileURL { get; set; } = "";

        [JsonPropertyName("targetPath")]
        public string TargetPath { get; set; } = "";

    }
For files and zip archives, the FileURL property contains the URL to the source. The TargetPath property contains a relative path to where this payload item should be downloaded or unzipped to. A download set could have multiple assets. I broke up the files for the the device that I was sending into several Zip files. Sorry, but in the interest of not inundating my site with several people trying this out, I’m not exposing the actual URLs for the assets here. The application will be grabbing a collection of these PayloadInformation items.
    public class PayloadInformationList: List<PayloadInformation>
    {
        public PayloadInformationList() { }
    }
The list of assets is placed in a JSON file and made available on a web server.
I might use some form of this again someday. So I’ve placed the initial URL from which the download list is retrieved in the Application Settings. In the compiled application, the application settings are saved in a JSON file that can be altered with any text editor.
About the Interface
The user interface for this application is using WPF. I grabbed a set of base classes that I often use with WPF applications. It made this using a build of Visual Studio that was just released a month ago that contains significant updates. I found that my base class nolonger works as expected under this new version of Visual Studio. That’s something I will have to tackle another day, as I think that there is a change in the relationship between Linq Expressions and Member Expressions. For now, I just used a subset of the functionality that the classes offerd. Most of the work done by the application can be found in MainViewModel.cs.
To retrieve the list of assets, I have a method named GetPayload() that downloads the JSON containing the list of files and deserializing it. Though I would usually use JSON.Net for serialization needs, I used the System.Text.Json.Serializer for my needs. Here, I also check the paths for characters indicating an attempt to go outside of the application’s root directory and thrown an exception of this occurs.
async Task<List<PayloadInformation>> GetPayloadList()
{
    HttpClient client = new HttpClient();
    var response = await client.GetAsync(DownloadUrl);
    var stringContent = await response.Content.ReadAsStringAsync();
    var payloadList = JsonSerializer.Deserialize<List<PayloadInformation>>(stringContent);
    payloadList.ForEach(p =>
    {
        if (!String.IsNullOrEmpty(p.TargetPath))
        {
            if (p.TargetPath.Contains("..") || p.TargetPath.Contains(":") ||
                p.TargetPath.StartsWith("\\") || p.TargetPath.StartsWith("/")
            )
           {
               throw new Exception("Invalid Target Path");
            }
        }
    });
    return payloadList;
}
Within MainViewModel::DownloadRoutine() (which runs on a different thread) I step through the payload descriptions one at a time and take action for each one. For folder items, the application just creates the folder (and parent folders if needed). For files, the file is downloaded from the web source to a temporary file on the computer. After it is completely downloaded, it is moved to the final location. This reduces the chance of there being a partially downloaded file on the memory card. The process performed for Zip files is a variation of what is done for files. The zip file is downloaded to a temporary location, and then it is decompressed from that temporary location to its target folder.
while (_downloadQueue.Count > 0)
{
    Phase = "Downloading...";
    var payload = _downloadQueue.Dequeue();
    DownloadProgress = 0;
    CurrentPayload = payload;
    switch (payload.PayloadType)
    {
        case PayloadType.File:
            {
                Phase="Downloading";
                var response = client.GetAsync(payload.FileURL).Result;
                var content = response.Content.ReadAsByteArrayAsync().Result;
                var tempFilePath = Path.Combine(TempFolder, payload.TargetPath);
                var fileName = Path.GetFileName(payload.FileURL);
                File.WriteAllBytes(tempFilePath, content);
                File.Move(tempFilePath, payload.TargetPath, true);
            }
            break;
        case PayloadType.Folder:
            {
                Phase = "Creating Directory";
                var directoryName = payload.TargetPath.Replace('/', Path.DirectorySeparatorChar);
                var directoryInfo = new DirectoryInfo(directoryName);
                if (!directoryInfo.Exists)
                {
                    directoryInfo.Create();
                }
            }
            break;
        case PayloadType.ZipFile:
            {
                WebClient webClient = new WebClient();
                webClient.DownloadProgressChanged += DownloadProgressChanged;
                webClient.DownloadFileCompleted += WebClient_DownloadFileCompleted;
                var tempFilePath = Path.Combine(TempFolder, Path.GetTempFileName()) + ".zip";
                var fileName = Path.GetFileName(payload.FileURL);
                var directoryName = payload.TargetPath.Replace('/', Path.DirectorySeparatorChar);

                if (String.IsNullOrEmpty(directoryName))
                {
                    directoryName = ".";
                }
                var directoryInfo = new DirectoryInfo(directoryName);
                if (!directoryInfo.Exists)
                {
                    directoryInfo.Create();
                }
                webClient.DownloadFileAsync(new Uri(payload.FileURL), tempFilePath);
                _downloadCompleteWait.WaitOne();
                Phase = "Decompressing";
                System.IO.Compression.ZipFile.ExtractToDirectory(tempFilePath, directoryInfo.FullName,true);

            }
            break;
        default:
            break;
    }
}
Showing Progress
The download process can take a while. I thought it would be important to make known that the process was progressing. The primary item of feedback shown is a progress bar. As long as it is growing in size, it’s known that data is flowing. I used the WebClient::DownloadProgressChanged event to get updates on how much of a file has been downloaded and updating the progress bar accordingly.
void DownloadProgressChanged(Object sender, DownloadProgressChangedEventArgs e)
{
    // Displays the operation identifier, and the transfer progress.
    System.Diagnostics.Debug.WriteLine("{0}    downloaded {1} of {2} bytes. {3} % complete...",
                        (string)e.UserState, e.BytesReceived,e.TotalBytesToReceive,e.ProgressPercentage);
    DownloadProgress = e.ProgressPercentage;
}
Handling Errors
Theres a good bit of error handling that is missing from this code. I made the decision to do this because of time. Ideally, the program would ensure that it has a connection to the server with the source files. This is different than checking whether there is an Internet connection. The computer having an Internet connection doesn’t imply that it has access to the files. Nor does having access to the files imply generally having access to the Internet. Having used a lot of restricted networks, I’m of the position that just making sure there is an Internet connection too possibly not be sufficient.
It is also possible for a download to be disrupted for a variety of reasons. In addition to detecting this, implementing download resumption would minimize the impact of such occurrences.
If I come back to this application again, I might first problem each of the reasources with an HTTP HEAD requests to see whether they are available. Such a requests would also make known the sizes of the files, which could be used to implement a progress bar for the total progress. Slow downloads, though not an error condition, could be interpreted as an error. Sufficiently informing the user of what’s going on can help prevent it from being thought of as such.
The Code
If you want to grab the code for this and use it for your own purposes, you can find it on GitHub.
Posts may contain products with affiliate links. When you make purchases using these links, we receive a small commission at no extra cost to you. Thank you for your support.
Though I feel like it has become a bit of a niche language, I enjoy coding with C++. It was one of the earliest languages I learned while in grade school. In one of the projects I’m playing with now, I need to iterate though a map. I find the ways in which this has evolved over C++ versions to be interesting and wanted to show them for comparison. I’m using Visual C++ 2022 for my IDE. It supports up to C++ 20. Though it defaults to C++ 14.
Chaning the C++ Version
To try out the code that I’m showing here, you’ll need to know how to change the C++ version for your compiler. I’ll show how to do that with Visual C++. If you are using a different compiler, you’ll need to check your references. In a C++ project, right-click on the project from the Solutions Explorer and select “Properties.” From the tree of options on the left select Configuration Properties->C/C++->Language. On the right side, the option called C++ Language Standard will let you change the version. The options there at the time that I’m writing this are C++ 14 Standard, C++ 17 Standard, and C++ 20 Standard.
Examples on How to Iterate
A traditional way that you will see for iterating involves using the an iterator object for a map. If you look in existing C++ source code, you are likely to encounter this method since it has been available for a long time and is still supported in newer C++ versions. This follows the same pattern you will see for iterating through other Standard Template collections. Though its recognizable to those that use the Standard Template Library in general, it does use pointers which have some risks associated with them. Note that I am using the C++ 11 auto keyword for the compiler to infer the type and make this code more flexible.
for (auto map_iterator = shaderMap.being(); map_iterator != shaderMap.end(); map_iterator++)
{
     auto key = map_iterator->first;
     auto value = map_iterator->second;
}
A safer method would avoid the use of pointers all together. With this next version we get an object on which we can directly read the values. I use references to the item. In optimized compilers the reference ends up being purely notational and doesn’t result in an operation. I also think this looks cleaner than the previous example.
The last version that I’ll show works in C++ 17 and above. This makes use of structured bindings. In the for-loop declaration, we can name the fields that we wish to reference and have variables for accessing them. This is the method that I prefer. It generally looks cleaner.
for (auto const& [key, blob] : shaderMap)
{

}
Why not just show the “best” version?
Best is a bit subjective, and even then, it might not be available to every project. You might have a codebase that is using some other than the most recent version of the C++ language. Even if your environment does support changing the language, I wouldn’t select arbitrarily doing so. Though the language versions generally maintain backwards compatibility, changing the language is making a sweeping change where, for a complex project, could have unknown effects. If there is a productivity reason for making the change and the time/resources are available for fully testing the application, then proceeding might be worth considering for you. But I discourage giving into temptation to use the newest version only because it is newer.


